

When it comes to maintaining your home’s roofing system, one of the most overlooked yet essential tasks is ensuring your roof vents are functioning properly. You might find yourself asking, “How to replace roof vents?” The process can seem intimidating, but with the right tools and guidance, it’s entirely manageable. Roof vents play a vital role in regulating attic ventilation, helping to maintain energy efficiency, and preventing moisture buildup, which could lead to structural damage or mold growth. In this article, we’ll walk you through the steps of replacing a roof vent, discuss whether you can do it yourself, and address the question of whether replacing roof vents requires changing the shingles.
How to Replace Roof Vents
Replacing a roof vent is a straightforward process, but it requires careful attention to detail. Here’s how you can replace a roof vent efficiently:
Tools and Materials Needed
To start, gather the necessary tools and materials:
- Safety gear, including work boots, goggles, and gloves
- A ladder for easy access to the roof
- Flathead and Phillips screwdrivers
- Utility knife to cut through roofing material
- Pry bar to remove old fasteners
- Caulk gun for sealing
- Roofing adhesive and nails or screws
- A replacement vent
Step-by-Step Process for Replacing a Roof Vent
1. Safety First
Before you begin replacing a roof vent, it is essential to prioritize safety. Roof work can be dangerous, especially if you’re not accustomed to working at height. Start by wearing the right protective gear: sturdy work boots, goggles, gloves, and a helmet for extra protection. Ensure the ladder you use is positioned on level ground, and its feet are firmly placed to prevent slipping. The ladder should be tall enough to reach the roof comfortably without overreaching, and always maintain three points of contact (two hands and one foot or two feet and one hand) while climbing. If you’re working in windy or wet conditions, consider postponing the job to avoid unnecessary risks.
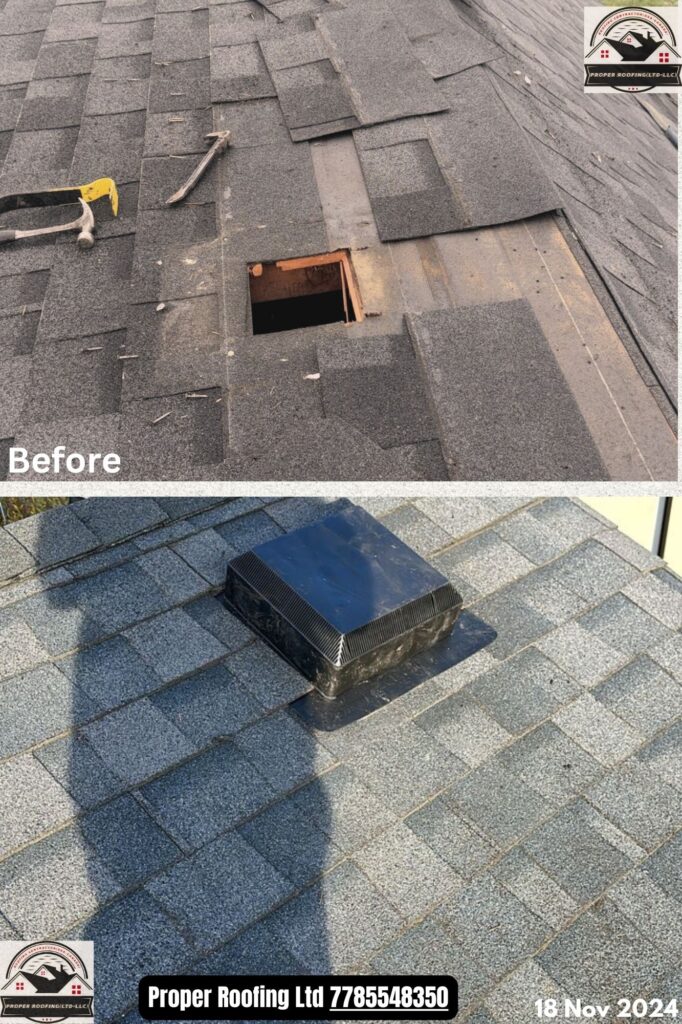
2. Remove the Old Vent
Once you’ve ensured your safety, proceed to remove the old vent. Start by carefully lifting the shingles around the vent. You may need to use a pry bar to gently lift them away from the roof and expose the fasteners that secure the vent in place. Be cautious not to damage the shingles as you lift them because you’ll need to reuse them once the new vent is installed. Next, remove any nails or screws that hold the vent to the roof using a screwdriver or a power drill. After that, cut through the sealant or roofing adhesive that might be securing the base of the vent using a utility knife. This will allow you to easily separate the old vent from the roof. Gently lift the old vent out of its position, taking care not to cause any damage to the surrounding roof material.
3. Prepare the Opening
Once the old vent is removed, you’ll need to assess the opening where the new vent will be installed. Inspect the area for any signs of damage, such as cracks, rot, or water infiltration. If you find any damaged roofing material or wood, make repairs before proceeding. This is crucial, as a compromised roof structure can lead to leaks down the road. Use roofing cement or appropriate wood filler to patch any holes or cracks. Additionally, check that the size of the opening matches the new vent you’re installing. If the vent is slightly larger or smaller than the existing opening, you may need to adjust the size of the hole to ensure a proper fit.
4. Install the New Vent
With the opening prepped and ready, apply roofing adhesive around the edges of the opening. This adhesive acts as a sealant, ensuring that the new vent is securely installed and waterproofed. Position the new vent into the opening, ensuring it fits snugly. Follow the manufacturer’s instructions for securing the vent, typically using nails or screws. Be sure to drive the fasteners through the base of the vent and into the roof structure firmly, but avoid over-tightening, which could damage the vent. The vent should sit flat against the roof, with no gaps between the vent and the surrounding roofing material.
5. Seal the Installation
After the new vent is installed, it’s time to seal the installation to prevent any potential leaks. Apply a generous amount of roofing sealant or caulk around the base of the vent, ensuring that all edges are thoroughly covered. This will provide an additional layer of protection against water infiltration. Once the sealant is applied, carefully reposition and secure the shingles around the vent. Overlap the shingles as they were originally positioned to ensure proper water runoff and to prevent any water from seeping beneath the shingles. The shingles should overlap the vent’s base and the adjacent shingles, creating a waterproof seal.
6. Final Inspection
The final step involves thoroughly inspecting your work. Ensure that all fasteners are properly tightened and that the vent is firmly in place. Look for any gaps between the shingles, the vent, or the roof surface where water could potentially get in. Check that the shingles are adequately overlapping and that there’s no visible damage to the surrounding roof. If necessary, add more sealant in any spots that may need extra protection. Once you’re confident that the installation is secure and watertight, your new roof vent is ready to function and help improve attic ventilation.
Following these detailed steps ensures that your roof vent replacement is done safely and effectively. By taking the time to inspect and prepare each component of the process, you can avoid common mistakes and prevent future issues like leaks or inadequate ventilation. If you ever feel unsure about performing the task yourself, don’t hesitate to contact a professional roofer to ensure the job is completed to the highest standard.
How to Replace an Old Roof Vent
Replacing an old roof vent involves similar steps to installing a new one, but there are a few additional considerations. First, check for signs that the vent is no longer working properly, such as increased humidity in the attic or visible damage to the vent itself. Once you’ve determined that a replacement is necessary, follow the outlined steps above to remove the old vent and install the new one. It’s essential to take extra care in ensuring the area around the vent is in good condition, as an improperly installed vent could lead to future roof leaks.
Can I Install a Roof Vent Myself?
While it’s possible to install a roof vent yourself, it’s important to consider your skill level and comfort with working at heights. If you have experience with roofing and feel confident in your ability to handle the task, then installing a roof vent can be a rewarding DIY project. However, if you’re unsure about the process or lack the necessary tools, it’s best to consult with a professional roofing company to ensure the job is done correctly.
Can You Replace Roof Vents Without Replacing Shingles?
In most cases, it’s possible to replace a roof vent without having to replace the shingles entirely. However, the shingles around the vent may need to be lifted and carefully repositioned during the replacement process. This can be done without causing significant damage if handled properly. Be mindful that mishandling the shingles could lead to leaks, so it’s important to take care when working in these areas.
Leading Coquitlam Roofing Companies: Proper Roofing
At Proper Roofing, we are proud to be one of the leading roofing companies in Coquitlam. Our team of experienced professionals is dedicated to providing high-quality roof repair and replacement services, including roof vent installations. Whether you’re a homeowner in need of roof vent replacement or facing more extensive roofing issues, we are here to help with our comprehensive Coquitlam Roofing Services. Our experts will ensure that your roof vents are properly installed, sealed, and ready to maintain efficient attic ventilation.
Conclusion
Replacing your roof vents is a crucial part of roof maintenance that ensures your home remains safe, efficient, and protected from the elements. Whether you choose to take the DIY route or rely on a professional, it’s essential to understand the process and know when to seek help. Proper Roofing is here to help Coquitlam residents with all of their roofing needs, from vent replacements to full roof replacements. As one of the leading Coquitlam roofing companies, we are committed to providing top-tier service to keep your roof in excellent condition.
If you’re ready to replace your roof vents or need assistance with any roofing project, don’t hesitate to contact Proper Roofing. Our team is ready to help you maintain your roof’s integrity and functionality. Whether it’s a minor vent replacement or a full roof overhaul, we have the expertise to get the job done right. Contact us today for a free consultation and let us help keep your home safe and well-ventilated. Trust Proper Roofing for all your Coquitlam roofing needs!
Check out our social media pages below:
Here are other related articles about roofing for you:
Can You Replace Part of a Roof?
